Beef Short Rib Stir Fry – v1 – November 2010

For some reason I’ve been on a kick for beef short ribs, (call it a case of having Korean barbecue on the brain.) And since there are no Korean barbecue places in town to get my fix, I quickly brainstormed on what to make as a quick substitute. And what kept popping up in my head was to make a “stir fry”, which is funny because I haven’t made “stir fry” in years. And looking back in retrospect, most of the “stir fry” that I did make back in the day, I won’t even consider cooking again. So I thought, why not try to re-boot the stir fry with all the cooking know how that I’ve picked up over the years, and make a better stir fry. So here are the ingredients that I was able to cobble together around the house to make this dish:

Ingredients:

  • 1.25 lbs of boneless beef short ribs, cut into thin & short strips
  • 1/2 cup soy sauce
  • couple of shakes of fish sauce
  • 1 TB Hoisin sauce
  • 2 TB light brown sugar
  • 1 TB Toasted Sesame oil
  • 3 TB Vegetable Oil
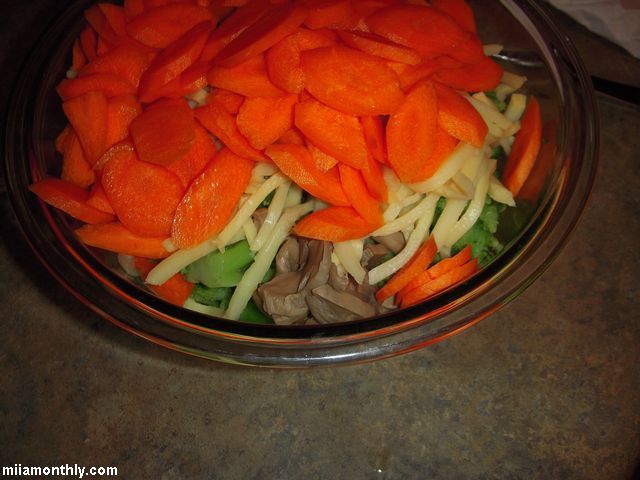
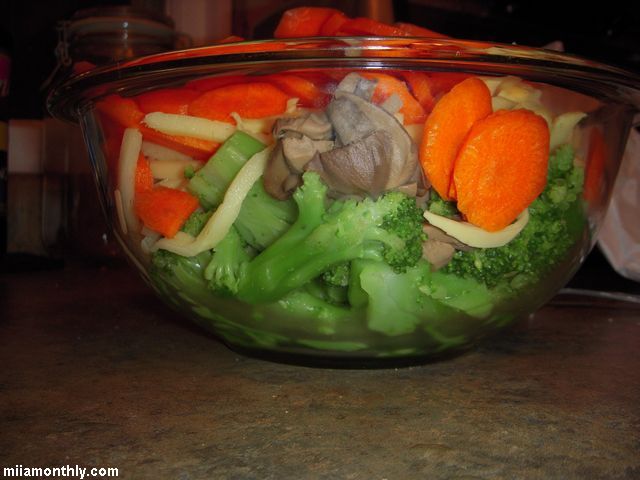
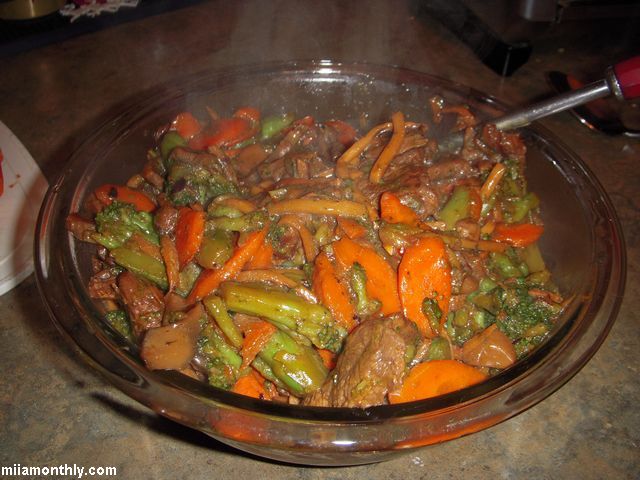
  • 1 lb Frozen Broccoli
  • 4 carrots, sliced on a mandolin
  • 1 small can of button mushrooms
  • 1/2 a can of bamboo shoots
  • 1 TB Corn Starch
  • 1/4 cup of cold water
  • A pinch of red pepper flakes

Technique:
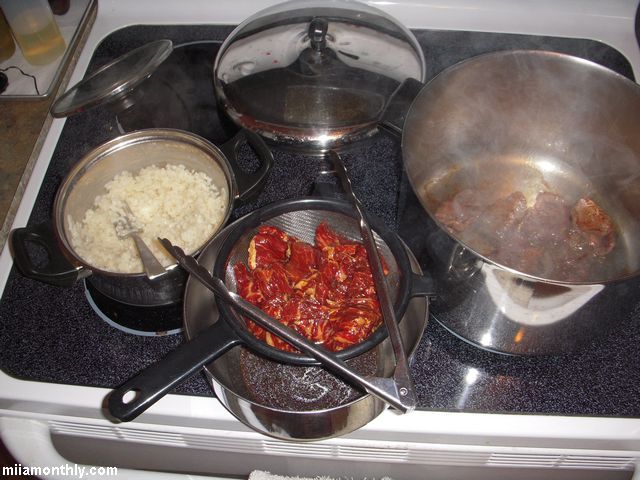
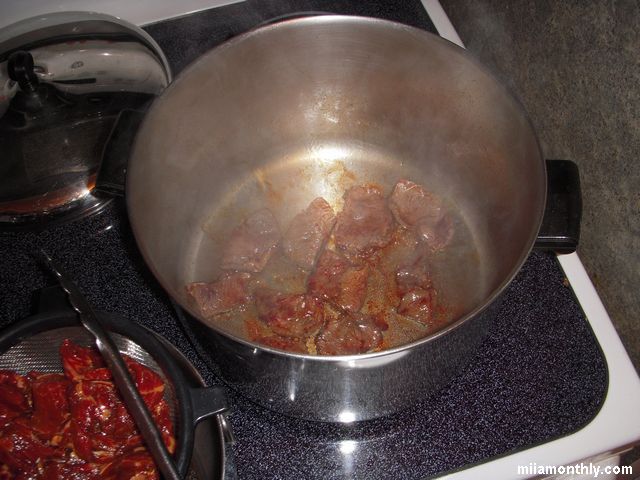
Combine the soy sauce, fish sauce, hoisin sauce, brown sugar and sesame oil into a quick marinade, add in the sliced beef, and let it soak for 30 mins. Then heat up a large stock pot to medium high, and added 1 TB of the vegetable oil, and cook the beef in three batches until browned, about 2 mins total cooking time per batch. Reserve and strain all the marinade liquid, as well as all the juices from the cooked beef.

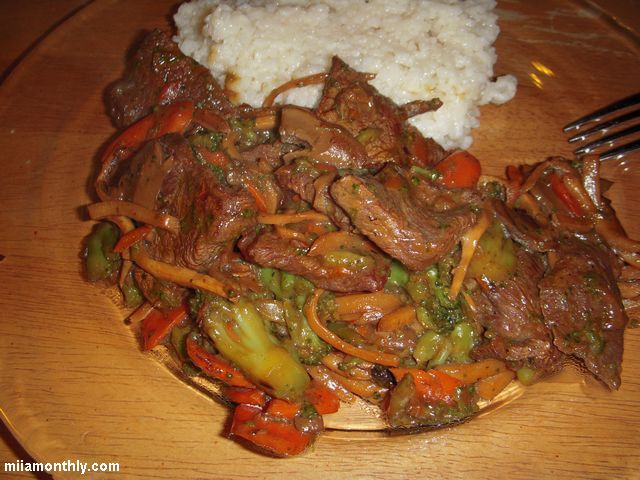
Now in the empty stock pot, add the remaining vegetable oil, keeping the heat on medium high, and cook all the vegetables for about 15-20 mins until tender. While the vegetables are cooking, add the corn starch to the water and then whisk it into the saved marinade and cooking juices. With the vegetables done cooking, add back the cooked beef and the corn starch mixture, and mix everything up until the sauce has thickened, about 2-3 mins. Then serve with white rice or ramen noodles.

Total cooking time: 60 minutes, broken down as follows; 30 minutes to marinade the beef, and 30 minutes to get everything cooked up (beef, vegetables and sauce).

Final flavor – 11/1/2010 @ 8:45pm
This ended up turning out way better then expected. But really how hard could it be to screw up a stir fry? (Answer: Pretty easy if you don’t know what you’re doing in the kitchen.) First thing first, the short ribs were totally awesome in the stir fry, got to love that heavy marbling in the meat. But as for changes next time around, I would add another pound of broccoli to the mixture (for two pounds total), since there wasn’t enough broccoli with my beef. Plus I would add a bit more of the red pepper flakes, since you really didn’t get much heat from eating the stir fry. But other then that, this recipe is a pretty good start point in any stir fry adventures.

The Aji and Jalapeno Flakes are dry – 2010

It turns out that these flakes dried a lot faster then I had expected, go figure. It only took 4 days for them to dry out completely, and that’s only because I gave the peppers an extra day and half in the dryer, since the shredded Jalapenos were very slow to dry.

Looking over the final product, the Aji turned out much more like a flake from using the normal Cuisinart blade and pulsing the motor. Compared to the Jalapeno flakes in which I used the shredding disc on the Cuisinart. Since the Jalapenos seemed to have clumped up badly during the drying process.

But seeing how I had absolutely no information to start with in executing this cooking experiment. I kind of had to make it up as a went along.

I haven’t tasted any of the flakes to see how they turned out, since I was too busy choking on the capsaicin fumes from the basement. So I’ll leave the taste testing for another time.

Baked Mac & Cheese – v1 – Oct 2010

This mac & cheese, is really the first time that I’ve made a baked mac & cheese from scratch before. I kind of had a general recipe to go by, but as you’ll see below. I kind of missed a few critical points in winging my recipe. But lets at least knock out a couple of major items in making this mac and cheese on the fly. First and foremost was that it was 9pm on a Sunday when I started to make this recipe, so I really didn’t want to go to the grocery store to get any missing items. This meant that I had to make do with what was already in the house, meaning that I didn’t have, whole milk, eggs, or cheddar cheese. But what I did have on hand was one can of evaporated milk, a bunch of random cheeses, 1/2 gallon of heavy cream, butter, flour, onions, pasta, olive oil and Parmesan cheese. So after a bunch of searching online, I found a mac & cheese recipe that used a roux, so I was off and running. It wasn’t until way, way, later on that I realized that I didn’t fully read the recipe. But that is part of knowing how of cook, and correcting mistakes on the fly, since all I had to do was improvise when it came to the milk/evaporated milk/heavy cream situation below in the side notes.

And with that out of the way, here is the recipe that I ended up creating, based in part on this recipe:

  • 1 lb. Medium Shells, cooked and drained
  • 1-2 TB Extra Virgin Olive Oil
  • 1 large yellow onion, diced
  • 4 TB (1/2 stick) unsalted butter
  • 3 tablespoons all-purpose flour
  • 1 can (12 fl. oz.) NESTLÉ® CARNATION® Evaporated Milk
  • 1 cup heavy whipping cream
  • ~4 oz Shredded Mozzarella
  • ~4 oz Shredded Monterrey Jack
  • ~10 oz Shredded Habanero Cheese
  • 1/4 cup Parmesan Cheese or breadcrumbs or crackers to top
  • Salt & Black Pepper

It’s easier to think of this recipe, in terms of what needs to be done in two separate pots at the same time:

In Pot #1) Fill the pot with water and bring to a boil, then add some kosher salt. Add the pasta and cook until it is al dente. Drain, and then return the pasta to the pot.

And then in Pot #2) Place on the range and heat to medium (#5), add the olive oil and onions. Sweat until the onions are lightly browned. Add the butter and wait until melted, then add the flour and stir to make a roux. After the roux has formed, and starts to turn a light brown color, slowly add in the evaporated milk, stirring the whole time. Then cook the roux until thickened, about 5-10 minutes. Then dump all the roux, all the heavy cream and all the cheese into the pasta in Pot #1. Mix until fully blended. Then dump into a large Pyrex dish, and top with either Parmesan cheese or breadcrumbs and bake for 30 minutes in a pre-heated 400°F oven, until browned and bubbly on top. Allow to cool and set for 5-10 minutes before serving.

Side Notes:
1) As I mentioned above, I really didn’t bother to read the recipe in detail before making the dish. Since if I had read the recipe, I would have realized that I needed three cans of evaporated milk instead of one can. Hence the addition of heavy cream at the very end of the recipe. So next time I make this dish, I’ll have to get a couple of extra cans of evaporated milk, since I really don’t keep any in the house.
2) Also part of not reading the original recipe, was running into the situation of having a thick roux putty, when I started to add the cheese to the roux. I was only able to add about 1/2 of the cheese before I stopped, since something didn’t make sense (not enough evaporated milk in the pot). So I dumped the putty roux into the pasta, along with the other half of the cheese, and stirred until fully blended. But with not enough liquid dairy in the mixture, things where looking a little too thick. So this is when I started to stir in 1/4 cup at a time of heavy whipping cream, until things started to look creamy. Which ended up being after 1 cup of heavy cream was added to the mixture.
3) If you have a Cuisinart, this is the recipe to use it on. Since it would have taken forever to shred all the cheese by hand. Could you do it by hand? Sure. But like all other mis en place, if you can find a faster way to get it done, then go with it. But its tasks like this, or mincing peppers, that sways me in agreeing with Bittman’s argument, on the value of owning a food processor in the kitchen.

Tasting Notes: 10/24/2010 @ 10:26pm
The mac and cheese turned out nice and spicy, with the habanero spice increasing with every bite. But for some reason after baking, the habanero heat is less intense then I was expecting (but still way more hot, then what the majority of people can handle). It was creamy, but it probably could have used just a bit more liquid, since it wasn’t a dripping off your fork kind of creamy. But overall for a first attempt, it came out better then expected.

Tasting Notes: 10/25/2010 @ 1:00pm
Surprisingly this mac and cheese reheats very well in the microwave, with very little separation of the roux. But it seems that the key to reheating in the microwave, is to use 50% power instead of 100% power, since at 50% power it seems to do a better job of evenly heating up the mac and cheese without the dish getting greasy from the butter separating.

Other online versions of mac & cheese recipes from the Carnation website:
Cheesy Macaroni and Cheese
Macaroni Cheese for a Crowd
Traditional Macaroni and Cheese
Top of the Stove Mac n Cheese