Christmas Eve 2010 – Baked rainbow trout with lemon & green onions

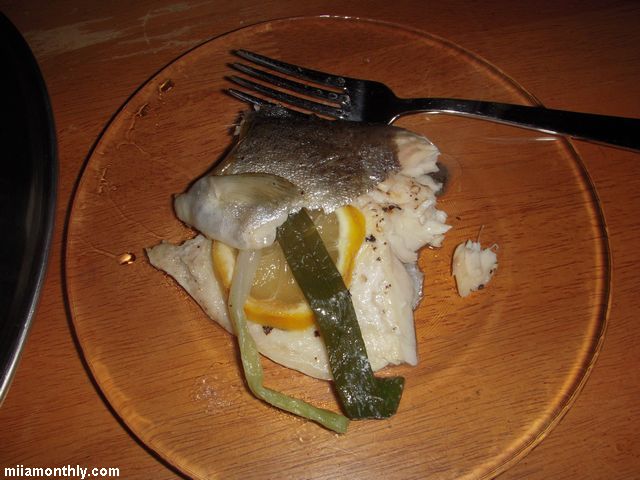
I needed a quick and easy recipe to bake a fish for Christmas Eve, so I ended up finding a recipe on the Food Network website, and modified the hell out of it as usual.

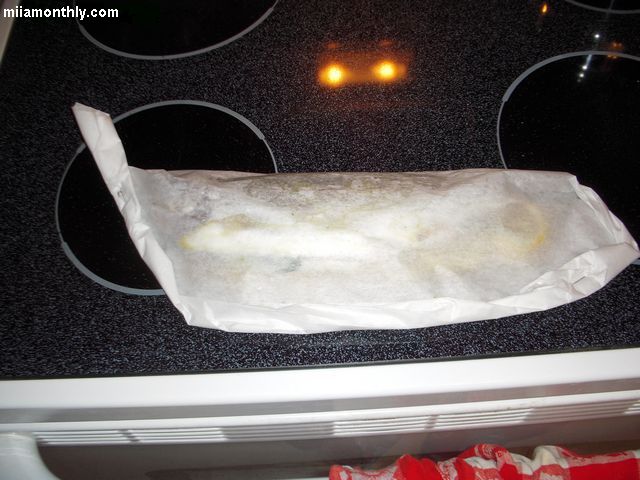
My original inspiration for making this dish, was seeing Jacques Pépin a long time ago on either Fast Food My Way, or Cooking with Julia, but I just can’t remember which one off  hand. But what I do remember from Jacques, was him using a parchment paper pouch to cook the fish in the oven.

So with my basic recipe in hand, and a vague memory from Jacques, I was off and running.

Ingredients (serves 2-3):

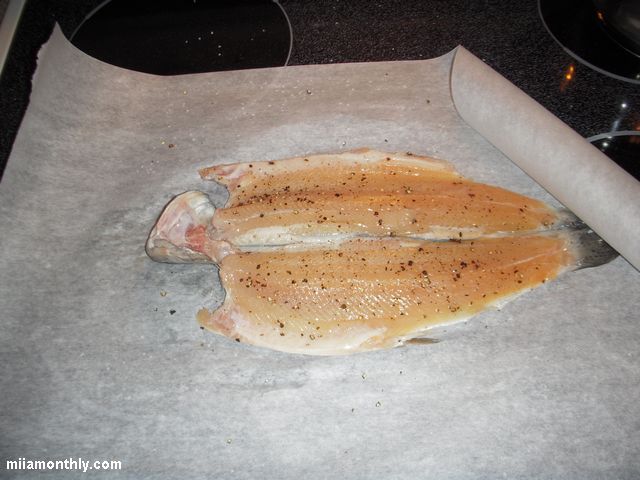
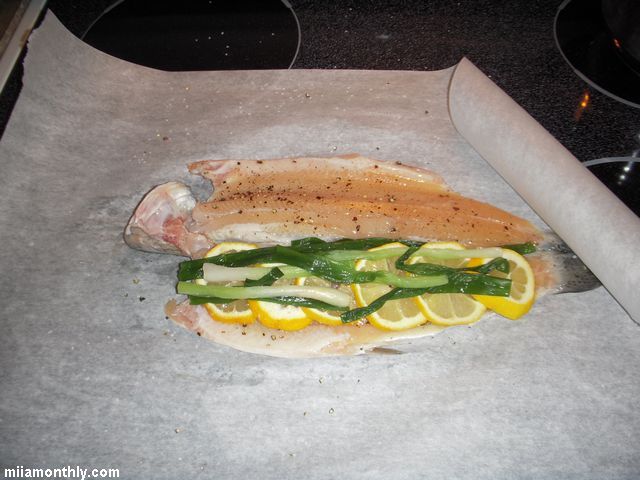
  • One farm raised rainbow trout, head-on, approximately 3/4 lb in total weight
  • One whole lemon, sliced
  • Herbs (most recipe use thyme or rosemary, but I had some green onions on hand that I wanted to use)
  • Kosher Salt and Finely ground black pepper
  • Extra Virgin Olive Oil

Technique:
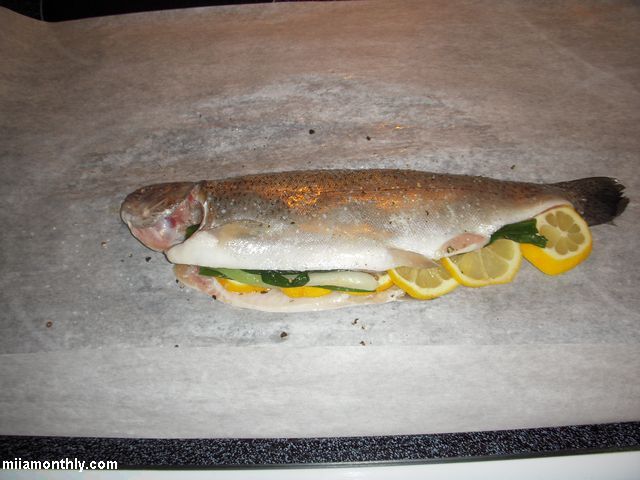
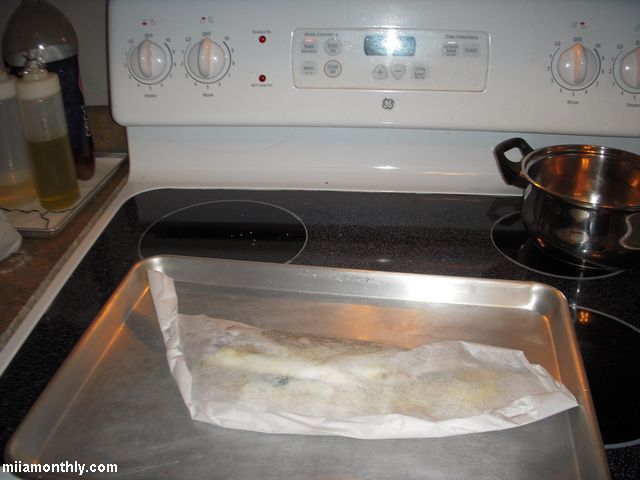
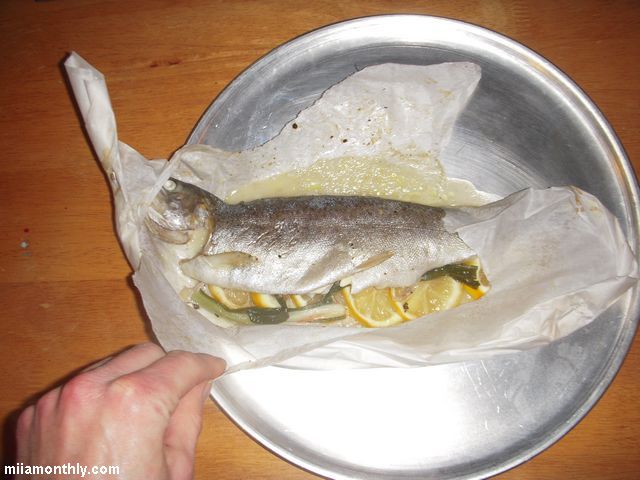
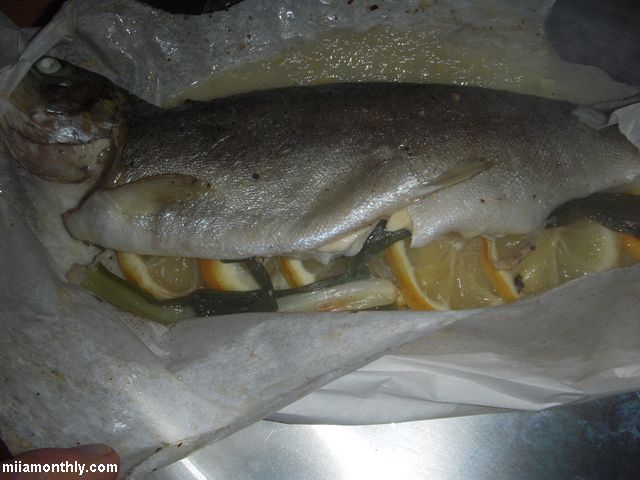
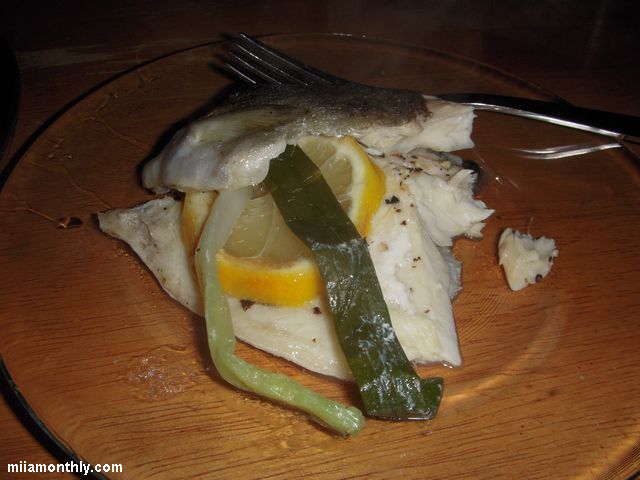
Pre-heat the oven to 375F. Wash the fish inside and out, then season with salt and pepper on all sides. Lay the fish on a sheet of parchment paper, and place the lemon and herbs inside the fishes belly. Fold the fish back together, drizzle with olive oil, and fold the pouch to seal tightly. Place the parchment pouch on a rimmed baking sheet, and pop it into the oven to bake for 20-25 mins. Once done baking serve immediately.

Side Notes:
1) If the fish is about 3/4 lb, go with 20 mins, but if closer to 1 lb go with 25 mins. For the 3/4 lb fish that I cooked, I went with 25 minutes, and the fish ended up being slightly on the dry side. So don’t overcook that poor fish.
2) Like I mentioned with the herbs, I used green onions, only because I had of bunch of them on hand. So feel free to experiment with fresh or dried herbs.
3) Don’t go overboard on the black pepper. For some reason, a little goes a long ways in the recipe. Also use a finer grind, since a courser grind added a unnecessary “heat/spice” element to the flavor of the fish.
4) For an off the cuff recipe, this fish turned out pretty good. So I’ll have to remember this recipe, if I ever need a quick fish dish.

Pickled Carrots – v1 – July 2010

So onto one of the first canning experiment, making a batch of pickled carrots. My original idea was to use the bag of carrots that I had in the fridge to make a carrot soup recipe that I saw in Food & Wine magazine. But as usual, one thing led to another, and the carrots that were meant for soup ended up being pickled.

Here are the two base recipes (Number 1 & Number 2) that I used as a starting point. But I ended up taking more of a cue from recipe #2, since it was an adapted recipe from Gourmet Magazine:

  • 2 lbs baby carrots (Dole carrots in a bag)

Brine:

  • 2 1/2 cups water
  • 2 cup plain vinegar
  • 1/2 cup white sugar
  • 3 TB canning salt

Per pint jar:

  • 1 whole clove of garlic
  • 1 dried bay leaf
  • 1/2 tsp whole black peppercorns

Yield 4 pints

In a pot of salted water, I cooked the baby carrots for 5 mins so that they were halfway cooked. The carrots were then cooled down in an ice water bath, to stop the cooking process. While the carrots were cooking and then cooling down, in another pot bring all the brine ingredients to a boil, then keep the mixture simmering for at least 15 minutes.  At the same time that you are heating up the brine, pre-heat four pint sized canning jars in large pot of hot water. Once the brine is done cooking, remove the pint jars from the pot and drain. Then place the spice mix at the bottom of each jar, placing the par-cooked carrots on top of the spice mix. Finally fill the jars with the hot brine to within a 1/4″ of the top of the jar, remove all the air bubbles using your preferred method (mine is using the Food Saver jar attachment),  cap, and then process in a boiling water canner for 15 minutes. After the jar are done processing, place them on a tea towel in a draft-free location to let the vacuum seal form, and to allow the jars to cool down. After 24 hours, any jars that haven’t seal need to be refrigerated, and the others that did seal can be put away to “age” before consuming.

Side Notes:
1) Since I only canned these carrots this past weekend (so 5-6 days ago.) I’m going to wait another week or two before giving them a taste test. That way the vinegar will have some time to mellow and spices will get a little more time to work their flavor magic.
2) Strangely enough, the amount of liquid listed above is enough to fill up all four pint jars with no waste.
3) For some reason online, their are a lot of recipes for pickled carrots with dill. And the idea of pairing dill and pickled carrots just wasn’t doing it for me. So I pretty much went off into my own direction, with a lot of guidance from the Gourmet recipe for a starting point.
4) Most of the pickled carrot recipes I read online, were all over the board is far as sugar in the brine (1/2 cup to 2 cups.) which to me seemed like way too much. So I went with the Gourmet recommendation of 1/4 cup per pound of carrots.

Sausagefest – July 2010

Nothing to me says Forth of July, like grilling out with family and friends. So I thought that I would do something a little special this year and make my own sausages for the Forth. But what really spurred the decision to make fresh sausage was when I found out that Fareway sells fresh casing packed in brine for $14.99 a pound. So after I bought a 1/2 lbs worth of casing, it kind of pushed me in the direction of making fresh sausages. Continue reading

Potato Chip Review – Jays Crispy Ridged Open Pit

Notice on the front of the bag, how the tomato is in front of the bottle of Open Pit BBQ sauce? Well I guess the reason that they did that was because you get overwhelmed in the taste of sugary tomatoes instead of BBQ flavor. And this taste totally threw me for a loop since the main smell of the chips is worchestershire sauce.

I have to say that I’m pretty disappointed with this flavor, since I was expecting more BBQ and less tomato flavor. But I would have never know how these chips tasted, unless I would have gotten a bag.

So I’m putting this flavor into the category of “once is nice, but no repeat purchase.” On to the next flavor!

Hot Microwave Oatmeal with Raisins and Brown Sugar – v1

For some reason I have two tubes of Quaker Quick Oats in my pantry, even though I don’t know how they got there. I though about making some oatmeal raisin cookies (maybe as a weekend project.) But since its still freezing outside, I might as well learn how to make hot oatmeal in the microwave.  So starting with the basic recipe listed on the back of the tube, here is what I came up with. Continue reading

Guacamole Recipe – v4

For some strange reason avocados from Chile were on sale at Wal-Mart for $.50 each. So not being one to stare a gift fish in the mouth and take advantage of a food opportunity. I ended up buying about eight of them, which provided me an excellent opportunity to work on a guacamole recipe on the cheap. Since testing out guacamole recipes at $.99 an avocado really isn’t the best use of my grocery dollars. But at $.50 a piece I’m more then willing to throw a little bit of caution to the wind in trying to develop a usable guacamole recipe. Continue reading

Potato Chip Review – Lay’s Salt and Vinegar

This is another one of those flavors that I picked up at the Meijer in Kalamazoo. Call them the staid big brother verse his skater punk little bro in the Lay’s Dill Pickle chips.

Once upon a time, I might have had a fun size bag of Lay’s Salt and Vinegar chips in high school, because I remember not liking the tart vinegar flavor in high school. So I basically avoided salt and vinegar flavored chips until this current purchase. So lets reload an oldie but a goodie into the flavor mill. Continue reading

Potato Chip Review – Jays Regular Potato Chips

These were one of the bags of chips that I picked up at the Meijer in Kalamazoo. And after having a small bowl of these chips, I have to say that the saying on the bag is true and you really “can’t stop eating ’em.” The taste of these chips reminds me a little bit of my favorite plain chips, those being regular Better Made chips (review coming soon.) The Jays have a little bit of a corn smell/taste being that they are fried in corn oil, but its nothing overpowering. If anything the smell of these chips remind me of CornNuts (which are pretty good, in and of themselves.) Continue reading

Pita Bread Recipe – v2 & v3

After making pita bread with the original recipe, I noticed that the pitas would get very tough, almost leather like once the pita’s had cooled from baking. So I started flipping through this old bread baking book that I own for some problem solving help. And in the bread books recipe for pita bread it mentioned that if your pitas are very tough after baking, that it usually means that the bread has too much gluten. They recommended that the easiest way to correct the issue is that instead of using all high gluten/bread flour, to go with a 50/50 mix of bread flour and all purpose flour. So for version 2 of the recipe, I went with the 50/50 mix and kept anything else the same. Well this batch of 50/50 pitas still turned out tough. So after that little experiment failed (as well as the books advise being total BS), I was pretty much out of idea’s on why my pita’s were coming out tough.

About a couple of months ago, I was doing some cooking for my sisters Halloween dinner party, and one of the dishes that I had to make were pizza shells for “candy corn pizza wedges” (don’t ask.) I used my normal pizza dough recipe, but the flour I used was a super high gluten flour from Cargill that my sister had on hand. Since the wedges were going to be baked a second time so that the cheese could melt to make the wedges look like candy corn. Instead of fully baking the dough, I just blind baked the pizza shells for 3 minutes instead of the usual 5 minutes.
Well that ended up being the key, as to why my pita’s were turning out tough. But the more that I thought about it the more it made sense. Since with a longer baking time, it will make the bread drier (think about how soft under baked bread can be.) So with a 5 min bake time, I was baking more of a pita cracker (or pita chip) instead of a soft pita bread. So for v3, the only change was reducing the baking time from 5 minutes to 3 minutes on the original recipe.

One other change for v3 is that after I rolled out the pitas, I gave it a little extra time (5 to 10 minutes) of relaxing/rising time before popping the pita in the oven. One other thing that I still need to work, but that I’ve mentioned in the past, is not to roll out the pita too thin and basically working all the air pockets out of the dough. But both of these are just minor techniques that I need to keep working on with future batches of dough.

Side Note: I’m not posting any pics with this post, since the pitas pretty much look the same on the outside as the pitas in the original recipe.